

1⁄35Easy Wood Grain Effects
10
Comments
I've seen other modellers achieve spectacular results using oil paints over an acrylic base, but I hit several problems in the course of building the Albatros. While I just about got away with it for the interior, my attempts at the wood panels for the fuselage exterior were a disaster - the oil paints were a real dust magnet, took ages to "dry" and, even then, were so easily damaged that I ruined the effect in handling the parts to continue the build. I know the fault must lie with me but, finally, after several attempts and growing frustration, I scrapped the idea of using oils and went back to a technique I'd last used 30-odd years ago.
Stage 1
The first step is to paint the object to be "wood grained" in matt enamel sand or light tan (I haven't tried acrylics, but they'd probably work fine, so long as they are allowed to dry thoroughly). The key word here is "matt" - the surface must be nice and matt for the following stages to work. The colour isn't really important - I've used everything from beige through to tan - it simply gives a base for the next stage, although (obviously) the darker the base-coat, the darker will be the finished effect.Stage 2
Once the enamel paint is dry, paint it liberally with cheap poster colour from the art shop. I use Vandyke Brown, Burnt Sienna, Raw Sienna or Dark Ochre depending in the type of wood I'm trying to simulate (adding Grey would work well for heavily weathered and sun-bleached wood). Apply the poster paint without too much water. You can now see why the base-coat must be matt - the poster paint should cover easily with no tendency to pool into droplets (Pic. 1).Stage 3
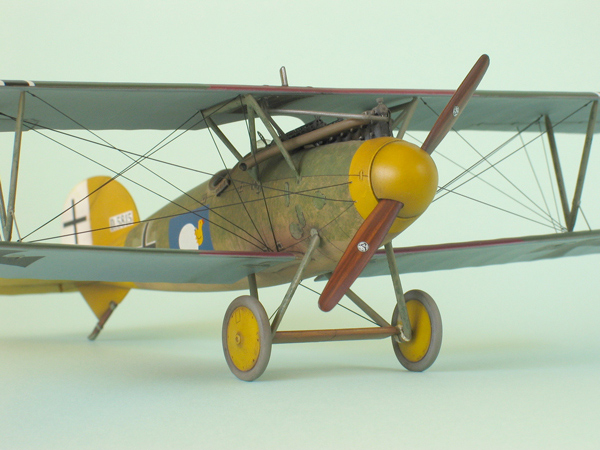
Once the poster colour is dry, dip a brush in water and wipe it on a clean tissue, leaving it damp (rather than fully wet). Draw the brush over across the poster colour in straight lines (Pic. 2) and it will begin to take off the water-based paint, creating a "grained" effect (Pic. 3). Clean the brush regularly and work steadily, checking the effect as you go. The beauty of the technique is that, if you do mess up, you can just apply more poster colour, wait a few minutes and try again. By varying the colour and the amount you brush off, you can easily create laminated effects like on the propeller in the header picture.Stage 4
The poster paint will dry in a few minutes, but I usually allow half an hour for safety. The last step is to varnish the finished item. This helps protect the finish and also has the effect of making the "wood grain" more pronounced (Pic. 4). Ideally, it's best to use an airbrush, but I often use Klear/Future applied with a paintbrush - so long as you don't brush too hard, it shows no sign of lifting the poster colour.Conclusion
This is a really easy way to create wood grain effects. The poster colours are both cheap and will virtually last forever - I'm still using pots I bought in the 1970s - and, because the poster paint dries so quickly, dust is much less of a problem than when using oils.


About the Author


FROM: NO REGIONAL SELECTED, UNITED KINGDOM
I've been modelling for about 40 years, on and off. While I'm happy to build anything, my interests lie primarily in 1/48 scale aircraft. I mostly concentrate on WW2 subjects, although I'm also interested in WW1, Golden Age aviation and the early Jet Age - and have even been known to build the occas...
Comments

This short feature describes a hassle-free way to create a "wood grain" finish which should have applications for all types of models.
Link to Item
If you have comments or questions please post them here.
Thanks!
OCT 22, 2005 - 09:37 PM

Just what I like, a nice simple to use technique.
Thanks Rowan.
OCT 22, 2005 - 10:34 PM

Rowan, when you say "poster paint", am I correctly assuming you mean Water colors?
OCT 23, 2005 - 01:08 AM
Hi Tom
Yes, poster paints are water-based. They are a cheap alternative to gouache and are often used in schools.
All the best
Rowan
OCT 23, 2005 - 01:23 AM


Fantastic tip there Rowan.
Will try your tip but use acrylics and see if it turns out the same way. Enamel drying properties are somewhat similar to acrylics anyway.
OCT 23, 2005 - 02:42 PM

Easy, simple and quick. Now that's what I call a Great Tip. Many thanks for that super useful tip Rowan.
OCT 23, 2005 - 05:27 PM

Rowan, I hope you don't mind... your instruction is copied and saved!
WC
OCT 23, 2005 - 06:11 PM


Copyright ©2021 by Rowan Baylis. Images and/or videos also by copyright holder unless otherwise noted. The views and opinions expressed herein are solely the views and opinions of the authors and/or contributors to this Web site and do not necessarily represent the views and/or opinions of KitMaker Network, KitMaker Network, or Silver Star Enterrpises. All rights reserved. Originally published on: 2005-10-23 00:00:00. Unique Reads: 42391

WEB HOSTING BY


Copyright ©2021 KitMaker Network and Kitmaker Network, a subsidiary of Silver Star Enterprises
All Rights Reserved. Please read our Conditions of Use and Privacy Policy.
All Rights Reserved. Please read our Conditions of Use and Privacy Policy.